
Packer, Photon, Python, Flask, WSGI, vROps. Holy smokes folks.. I’m not sure I could make a more click-bait-y post if I tried!
I recently took a position at a new company and had the opportunity to stand up a greenfield environment. Part of this environment was obviously configuring monitoring. Since we’re pretty heavily tied to VMware here, we’re using vROps for our monitoring. For escalation of alerts, we’re using OpsGenie, and for normal collaboration we’re using Teams. Unfortunately, vROps versions older than 8.4 do not support sending alerts to OpsGenie or Teams out of the box. Fortunately, we can still get this working with a bit of work.
Table of Contents
Overview
Update – Starting in vROps 8.4 you can use the webhook plugin that is delivered with vROps to accomplish this. LINK
While vROps does have the ability to send outgoing notifications via REST API, it doesn’t have the ability to let you customize what fields are sent, or how they are formatted. Because of this limitation, some very thoughtful folks created a project called webhook-shims. This is essentially a Python Flask project that accepts web requests, translates them, then forwards the correctly formatted request off to whatever system you want notifications sent to.
This project hasn’t been updated in over 3 years, has a number of pending PR’s and Issues, so my spidey sense says it’s likely dead. So please be smart about how and where you use this, and consider the implications of running this in production. That said, from a functional standpoint, it seems to work well, and in the rest of this post I’ll go over how to set this up to run in a production fashion.
The list to the right are the applications that the project supports, and the bold items are what I’ll show example configuration for.
- bigpanda
- bugzilla
- groove
- hipchat
- jenkins
- jira
- kafkatopic
- opsgenie
- pagerduty
- pivotaltracker
- pushbullet
- servicenow
- slack
- socialcast
- travisci
- vrealizeorchestrator
- zendesk
- moogsoft
- msteams
Approach
We’ll be running this whole project using Photon OS 4.
While we could simply run the python script in a screen, tmux, or similar session, but there are serious limitations in doing that. Admittedly, my python isn’t as strong as some of my other scripting languages, but after a bit of digging, it became clear that things like security, performance, and monitoring are either limited or unavailable if we do this. We’ll use a WSGI server called Gunicorn to run the python script, and use systemd to create a socket and service, and finally, use Nginx to connect directly to the socket. Whew! Even just reading that after completing this entire project feels like a lot, but don’t worry. As always, I’ll explain each step in detail and give you code to create this project.
Create Photon Packer Template
If you don’t know this about me by now, I’m a huge fan of packer. As such, we’ll be using it to create a template. You can find the source code for this packer template on my website’s github repository
To get a local copy, run the following command:
git clone https://github.com/jonhowe/Virtjunkie.com.git
You can find all source code in the directory Virtjunkie.com/Packer/PhotonOS4.
Create Custom ISO
Unfortunately, Photon OS, even in v4, doesn’t support providing the kickstart file via CD-ROM or floppy (see Issue#1113, Issue#798). Unfortunately, this means that if we want (or need) to use the vsphere-iso builder, we’ll need to create an ISO with the kickstart file embedded. I’m not going to duplicate documentation, so here’s the official documentation from VMware on how to add a kickstart file.
Instead of using the sample my_ks.cfg file provided in the ISO, use the version below.
IMPORTANT: Ensure that you replace [yourpassword] with your actual password
Use Packer To Create vSphere Template
IMPORTANT: Ensure that the password assigned to “root_password” in Virtjunkie.com/Packer/PhotonOS4/packer-photon.json.pkr.hcl matches what is set in the kickstart file above
|
1 |
packer build -var-file=nable.auto.pkrvars.hcl -var-file=vars iso-local-4.0GA.json -only=vsphere-iso.vmware-template packer-photon.json.pkr.hcl
|
Deploy Photon 4 VM
For production systems, I typically use Terraform to deploy my VMs, and that’s what I did. I’m not going to go over that, as I’ve done it before. If nothing else, just deploy the VM from a template, assign it a static IP in the guest customization specification, and then log in using credentials set in the kickstart file.
Configure Server
Install Packages
Execute the commands below to install required packages, and to clone the repository
Configure Shims
There’s a bit of config we’ll need to do in order to make this production ready.
Configure Teams
A fellow VMware vExpert, Shane Moore has an excellent article. So that I don’t recreate the wheel, please see his instructions for how to prep your environment to use Microsoft Teams.
In short, you’ll create a webhook connector in the Microsoft Teams channel, and plug the URL that you get from Teams into the teams shim file.
Configure OpsGenie
OpsGenie is pretty simple. All we’ll need to do is create an integration by selecting your team in Opsgenie, navigating to Integrations, then selecting Add Integration.

In the resulting list of available integrations, select API.

Then note the API key (you can grab it later, it doesn’t disappear when you navigate away). We’ll use that when we configure outbound settings in vROps to use OpsGenie.
Disable Unused Shims
In my environment, I’m only going to be using Teams and OpsGenie alerts. To reduce bloat and access points that could cause me security issues, I’m disabling all shims not in use.
Edit the file loginsightwebhookdemo/webhook-shims/loginsightwebhookdemo/__init__.py
Disable Welcome Page
This could probably be optional, but I appreciate not having a welcome/hello world webpage open for a production service. We’ll disable it.
Edit the file loginsightwebhookdemo/webhook-shims/loginsightwebhookdemo/__init__.py
Configure Systemd
Create two files: /etc/systemd/system/gunicorn.service and /etc/systemd/system/gunicorn.socket and populate with the text below.
/etc/systemd/system/gunicorn.service
This service file ensures that Gunicorn is started the same way, and is managed by systemd. You’ll note that it requires gunicorn.socket, which we will create later.
/etc/systemd/system/gunicorn.socket
This socket file sets permissions for the socket assigned to gunicorn
Configure Nginx
Replace the file /etc/nginx/nginx.conf with the contents below
This is telling Nginx to connect directly to the socket we’re creating with the systemd socket gunicorn.socket we created earlier.
Enable and Start All Services
Finally, enable, and start both services, and restart Nginx
|
1
2
3
4
5
|
systemctl enable gunicorn.socket
systemctl enable gunicorn.service
systemctl restart gunicorn.socket
systemctl restart gunicorn.service
systemctl restart nginx.service
|
Configure vRealize Operations Manager
At this point, all we need to do is configure an outbound instance for Microsoft Teams and OpsGenie.
Add a New Rest Notification Plugin
OpsGenie
To do this, sign into vROps, and navigate to Administration ->Management->Outbound Settings, or https://[Your_vROps_URL]/ui/index.action#/administration/outbound-alert-settings

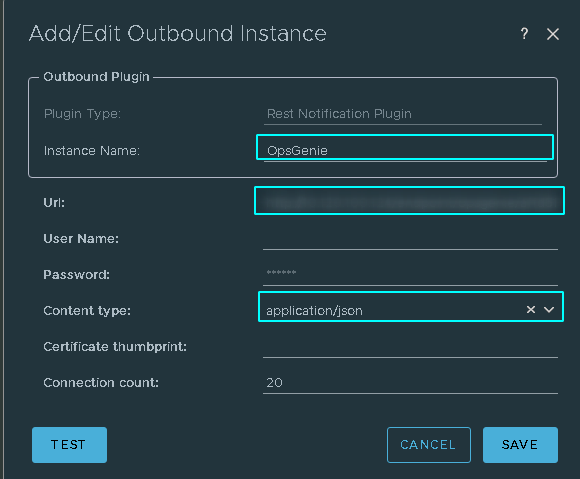
After you select the Rest Notification Plugin, there are 3 fields required in the Add/Edit Outbound Instance box
| Item | Description | Example |
| Instance Name | Name of the rest notification plugin created | Opsgenie |
| URL | URL to OpsGenie shim endpoint | http://<IP or Hostname of Photon VM>/endpoint/opsgenie/<api key> |
| Content Type | Content Type – Unless you’re working with a SOAP API (which we aren’t), this will always be application/json |
Finally, navigate to Alerts -> Configuration -> Notification (https://[Your_vROps_URL]/ui/index.action#/alerts/notifications) and add a new rule that targets the adapter you just created.

Teams
Again, I’m not in the business of recreating the wheel, so check out Shane’s blog for info on how to do this.
References
| https://www.virtuallyshane.com/posts/how-to-send-vrealize-operations-alerts-into-microsoft-teams | Fellow vExpert Shane Moore’s article for setting MS Teams forwarding |
| https://github.com/vmw-loginsight/webhook-shims | Official Github site for the webhook-shims project |
| https://blogs.vmware.com/management/2017/01/vrealize-webhooks-infinite-integrations.html | VMware Blog article that got me started on this journey |
| https://vmware.github.io/photon/docs/user-guide/working-with-kickstart/ | VMware Photon documentation |
| https://github.com/vmware/photon/issues/1113 | Github Issue for presenting Kickstart file to Photon over cdrom/floppy |
| https://github.com/vmware/photon/issues/798 | Another Github Issue for presenting Kickstart file to Photon over cdrom/floppy |
Hi Jon,
Excellent article, thanks! But since version 8.4, the Rest notification plugin is deprecated and replaced by the Webhook notification plugin, which can be configured as you wish/need.
You can create templates, input properties and much more. You can use the following variables OOTB :
${ENDPOINT_URL}
${CREATE_TIME}
${UPDATE_TIME}
${CANCEL_TIME}
${ALERT_STATUS}
${ALERT_ID}
${ALERT_DEFINITION}
${ALERT_DEFINITION_DESCRIPTION}
${ALERT_RECOMMENDATIONS}
${RESOURCE_NAME}
${RESOURCE_KIND}
${RESOURCE_ID}
${ADAPTER_KIND}
${RESOURCE_KIND_TYPE}
${ALERT_IMPACT}
${CONTROL_STATE}
${ALERT_CRITICALITY}
${ALERT_TYPE}
${ALERT_SUBTYPE}
${OBJECT_HEALTH_STATE}
${OBJECT_RISK_STATE}
${OBJECT_EFFICIENCY_STATE}
${SYMPTOMS}
${ADAPTER_INSTANCE}
${LINK_TO_ALERT}
Hope it helps! Cheers!
Great info SZ, I just read up on 8.4 (guess I’m a little out of the loop) and it definitely looks a lot more flexible. That said, I’m personally stuck on 8.2 until we upgrade some of our internal applications, but I can’t wait until we can use this!